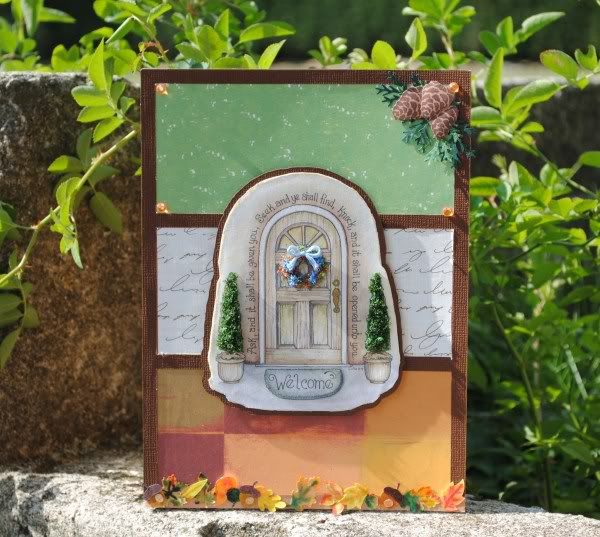
"And I say unto you, Ask and it shall be given you; seek and ye shall find; knock and it shall be opened unto you. For every one that asketh receiveth; and he that seeketh findeth; and to him that knocketh it shall be opened." Luke 11:9-10
How simple is that? Jesus said that if we ask, it will be given to us. Just... ask. It doesn't always seem that easy because a lot of times we pray for things and it seems nothing happens. But this scripture has really been true in our lives lately. I asked God, and He has given many times over in the last few weeks! I am so grateful to Him for His blessings!!
I am also thankful for my two best friends, whose birthdays are two days apart, two days after my hubby's birthday. I have three cards to be making over the next few days... well, two after this one. Odd that I would start with the last birthday instead of the first one! LOL
Today's card was made for Alisha, my wonderful friend and mentor. She and I have traveled the roads together many times, talking about in the Lord and growing in Him, hanging out together, playing Hand & Foot, and so much more. I so appreciate her wisdom and anointing as much as her friendship. She is a true friend.. she will quickly set me right back in the Word when I get off track and start in with the stinkin' thinkin', and I do the same for her. I am so grateful that Father has placed her in my life!
For this card, I used an image from Laurie Furnell's Heart & Soul CD that I purchased at PCcrafter.com. The evergreen leaves are a Martha Stwart punch, the pinecones are a rubber stamp from Stampin' Up!, and the leaves along the bottom are some punches and various cutting files from my Silhouette Cutting Machine. I colored them with my Sugarloaf markers and then added water with a Q-tip to blend the colors.
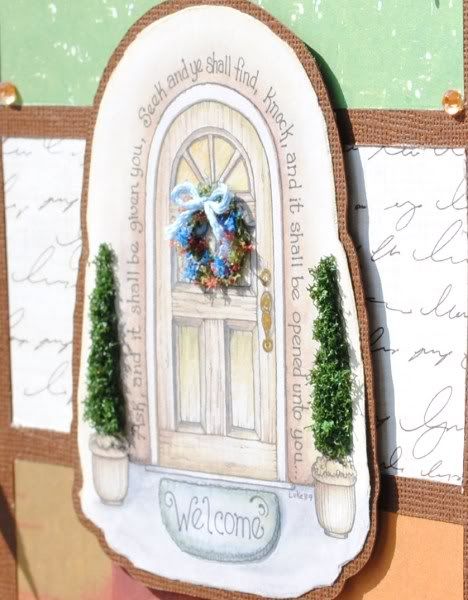
The wreath and topiaries, as shown in the enlargement below, are enhanced by using a product called FlowerSoft. I was really happy with how they turned out looking so real!
I am entering this card in the following challenges:
Card Makin' Mamas Use Punches
The Friday Mashup Autumn project using shades of Yellow & Orange
Card Patterns Giving credit for a great sketch!
Pile It On The Colors of Fall
Critter Sketch Challenge Photo Inspiration
Our Daily Bread designs Fall Colors
PaperPlay Challenges Punches & Dies
And if I had finished it in time, I would have entered it in the Stampin' Sisters In Christ Challenge that ended last night asking for a door and a scripture. :(
Sunday, September 18, 2011
Friday, September 16, 2011
My Little Octabox
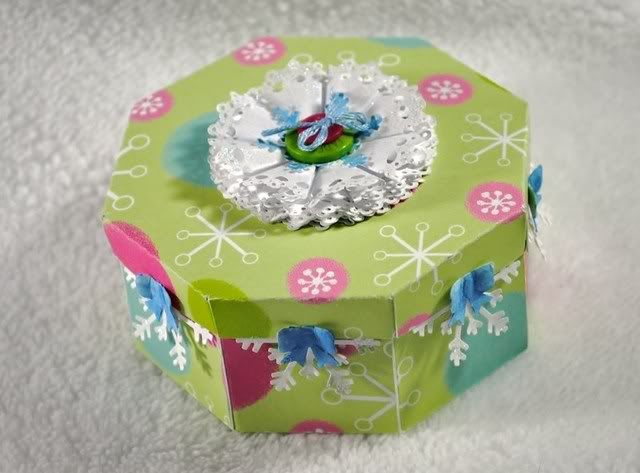
Now that all the mistakes are out of the way (see previous post), here is the finished octabox!
I know it's not December yet, or even snow weather, but I used a Christmas paper anyway. It's mid-September and I always get Christmasy around this time of year. So I have been playing Christmas music all day (driving my family nuts with it) and thinking about what kind of other Christmas things I can make.
The box is one I designed for a contest many years ago when I was in the Computer_Crafts Yahoo Group. The paper is from Hobby Lobby. I'm not fond of pink and lime for Christmas colors, but other than the little designs resembling snowflakes, it would be hard to tell it even is a Christmas paper. The trim around the edges were made with Martha Stewart's Snowflake punch and a bow punch I picked up a long time ago. I don't remember the brand. I created the adornment on the top from 'doilies' cut with my Silhouette, another snowflake punch, some buttons and a bit of embroidery thread. To top it all off and add some bling, I used Wet & Wild glitter nail polish to all of the snowflakes on the edge of the did and then to the whole lacy embellishment on the top. I just wish it would have shown up better in the photo.
I am entering this fun little box in several challenges,
Wednesday, September 14, 2011
Double whammy 'Duh'_ on me! LOL
Ok... so I'm gonna tell on myself here.
Years ago, I designed an octagon box template and this morning I decided to redraw it in Silhouette Studio. It worked great, so I sent it through the machine to be cut. While the machine was running, I went back and looked at it again in Studio and suddenly realized that I had totally forgotten to adjust the cut lines! So the machine was cutting every single line, even the fold lines! My box was no longer gonna be a box, just two flat octagons and a bunch of square and triangle pieces. So I waited for the machine to stop (while my BFF and my daughter laughed at with me). Finally the machine gets done and I pull out the cutting mat with the cardstock on it that would have been my box. But there is no box! There are not even 2 octagons and a bunch of squares and triangles cut out! There was NOTHING! Just a clean blank sheet of cardstock.
It was then that I realized that I had forgotten to put the blade back in this morning! ROFL I had taken it out to see if there was something wrong with it when after 3 cuts, it still wouln't cut all the way through the sheet of cardstock on a print & cut I did. (Never did figure that one out; unless it was because I was using a new, super-sticky cutting mat.)
The moral of the story: For those of you who have a Silhouette cutting machine, there are some things you should know. The first of which is this: The blade has to be IN the machine for it to work! LOL
BTW... I eventually did get the box finished!
Wednesday, August 10, 2011
Another Silhouette Discovery!
Ok, so I was just playing around with what I'd posted previously, and decided to try making all the elements/parts of a card to print & cut out.
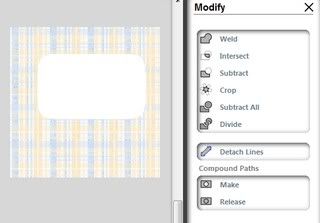
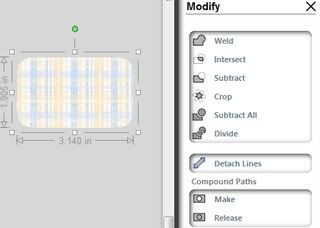
In doing this, I discovered that I can take any digital background, lay a white shape on top of it, hit 'crop' and it will merge the pattern on to the shape! No more being forced to use their limited fill patterns!
Again... if you have any questions, please ask and I will do everything I can to help!
Tuesday, August 9, 2011
Silhouette Discovery
Just thought I'd share this photo I took in Canton, Ohio in the art district. It was beautiful from all angles and at all times of day or night.
So today as I was playing in Silhouette Studio, I thought about all the thousands of Hugware and digi-scrap images I have and how I'd love to be able to print them and have my Silhouette do all the cutting. I wasn't sure if it was actually possible, but I figured it was worth a try. Sure enough, with a little playing around, adjusting some sizes and settings, I was able to create my own Print & Cut files from my own graphics! I haven't actually cut any of them yet, but at least I know I can! Next, I'm going after the black & white outline images (I guess they are now called digi-stamps?) so that I can color them myself. I hope to use them on cards and other projects soon!
I'm not good at writing or videoing tutorials, but if you have any questions, please get ahold of me and we will find a way that I can walk you through the process!
Sunday, August 7, 2011
Flutterbies
I'm back again already with another card for another contest. This time it is the Flutterbies challenge from Crafty Cardmakers.It was not my typical style of card, which is why I'm really happy with the way it turned out. I usually use lots of color and patterns, so to do this one almost all in white was very interesting! :)
Created on white cardstock, the edge is punched using one of Martha Stewart's border punches. The butterfly design on the front was cut using my Silhouette cutting machine, as well as the flowers making up the cluster on the inside. The butterflies inside are from a Martha Stewart punch. The hint of color on the front is from chalk pastels and the color on the inside is from watercolor pencils.
Created on white cardstock, the edge is punched using one of Martha Stewart's border punches. The butterfly design on the front was cut using my Silhouette cutting machine, as well as the flowers making up the cluster on the inside. The butterflies inside are from a Martha Stewart punch. The hint of color on the front is from chalk pastels and the color on the inside is from watercolor pencils.
Colour Create Challenge Entry
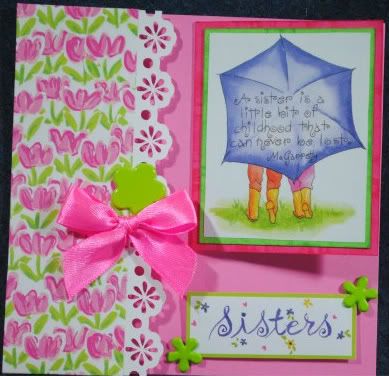
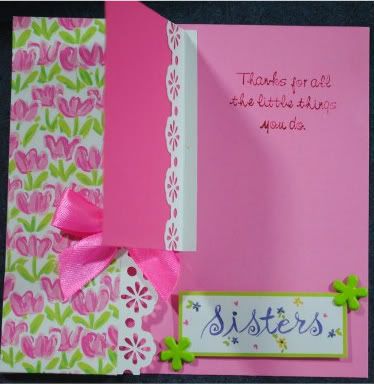
Well, as promised, I am sharing some of my newest creations. First of all is one I created for the Colour Create Challenge because I have ALWAYS loved Pink, Green and White together. My favorite shades of those colors are not the ones in this card, however, I do so love the floral paper and wanted something special to do with it. Someday I will do a project with the sweet, delicate, romantic, soft shades of pink & green and add all the pretties to go with them. Meanwhile, here are the pics of the card I created for this contest.
I have so many supplies from so many places that it will be hard for me to say what brand I'm using, but I believe that for the most part, I will be able to at least remember where I got them from. I do apologize.
On this particular card, the floral patterned paper came from one of many 3lb scrap packs that I bought at Hobby Lobby. The 'sisters' images are from the 2008 Easy Scrapbooking Calendar (day by day). The lace design was cut from white cardstock using my Silhouette cutting machine (which I LOVE so much and wouln't trade for anything!) The brads are from Hobby Lobby, and I made the bow from ribbon found in a child's create-a-dollhouse type kit.
On this particular card, the floral patterned paper came from one of many 3lb scrap packs that I bought at Hobby Lobby. The 'sisters' images are from the 2008 Easy Scrapbooking Calendar (day by day). The lace design was cut from white cardstock using my Silhouette cutting machine (which I LOVE so much and wouln't trade for anything!) The brads are from Hobby Lobby, and I made the bow from ribbon found in a child's create-a-dollhouse type kit.
Wednesday, August 3, 2011
I'm still alive! LOL
I've decided that I'm gonna try blogging again. It's been over a year, and a lot has happened since then. But instead of rehashing it all, I'm planning on doing a photo recap... as soon as I get an image resizer installed.
One thing that has happened is that I finally have a crafting area, and my daughter is crafting with me, so I will be posting some of our things, along with some great links I find.
Today's great link is posted on my sidebar... http://scrappinforkenzie.blogspot.com/ has a giveaway that is massive! I LOVE IT! She also has a beautiful baby girl! *grin* Head on over and check it out!
Subscribe to:
Comments (Atom)


